## Description This PR ensures that the default prettier config is used for examples and templates. This config is compatible with `prettier@3` as well (upgrading prettier is bigger change that can be a future PR). ## Changes - Updated `.prettierrc.json` in root with `"trailingComma": "es5"` (will be needed upgrading to prettier@3) - Added `examples/.prettierrc.json` with default config (this will change every example) - Added `packages/create-next-app/templates/.prettierrc.json` with default config (this will change every template) ## Related - Fixes #54402 - Closes #54409 |
||
|---|---|---|
| .. | ||
| components | ||
| docs | ||
| lib | ||
| models | ||
| pages | ||
| public/favicon | ||
| styles | ||
| viewmodels | ||
| .env.local.example | ||
| .gitignore | ||
| kontent-ai-backup.zip | ||
| next-env.d.ts | ||
| package.json | ||
| postcss.config.js | ||
| README.md | ||
| tailwind.config.js | ||
| tsconfig.json | ||
A statically generated blog example using Next.js and Kontent.ai
This example showcases Next.js's Static Generation feature using Kontent.ai as the data source.
Demo
https://next-blog-kontent-ai.vercel.app/
Deploy your own
Once you have access to the environment variables you'll need, deploy the example using Vercel:
Related examples
- AgilityCMS
- Builder.io
- ButterCMS
- Contentful
- Cosmic
- DatoCMS
- DotCMS
- Drupal
- Enterspeed
- Ghost
- GraphCMS
- Kontent
- Prepr
- Prismic
- Sanity
- Sitefinity
- Storyblok
- TakeShape
- Umbraco heartcore
- Webiny
- Blog Starter
- WordPress
How to use
Execute create-next-app with npm, Yarn, or pnpm to bootstrap the example:
npx create-next-app --example cms-kontent-ai cms-kontent-app
yarn create next-app --example cms-kontent-ai cms-kontent-app
pnpm create next-app --example cms-kontent-ai cms-kontent-app
Configuration
1. Create an account on Kontent.ai
First, create an account on Kontent.ai.
The link above will provide you with the 30-days trial. Once you finish the trial, or even during the trial period, you can switch to the developer plan which is free of charge and offers all the features you'll need to test out the example capabilities.
After signing up, create an empty project.
2. Create the content models and fill them with data
The content model defines the data structures of your application/websites. The structures are flexible and you can tailor them to your needs.
For this example, you need to create a content model that defines an author and a post content type. You can import these automatically or by doing it manually to familiarize yourself with the Kontent.ai user interface.
To import the content models with their data follow the next steps:
-
Enter Kontent.ai application
-
Go to "Project Settings" and select API keys
-
Activate Management API
-
Copy
Project IDandManagement APIkey -
Install Kontent.ai Backup Manager and import data to the newly created project from kontent-ai-backup.zip file (don't forget to place appropriate values for apiKey and projectId arguments):
npm i -g @kontent-ai/backup-manager kbm --action=restore --apiKey=<Management API key> --projectId=<Project ID> --zipFilename=kontent-ai-backup -
Go to your Kontent.ai project and publish all the imported items.
Note: You can deactivate the Management API key, as it is not necessary anymore.
2.1. (Optional) Create the content models manually
You can ignore this step if you already imported the content models in Step 2.
Create an Author content type
In your Kontent.ai project, go to the Content models and add a new Content type:
you don't have to modify the element configuration unless specified
- Content type name:
Author - Add the following content elements
Name- Text elementPicture- Asset element - configure to allow to selectAt most 1asset andLimit file typesonly toAdjustable images
Save the content type.
The content type should look like this:

Create a Post content type
In your Kontent.ai project, go to Content models and add a new content type:
you don't have to modify the element configuration unless specified
- Content type name:
Post - Add the following content elements
Title- Text elementDate- Date & time elementExcerpt- Text elementContent- Rich Text elementCover Image- Asset Text element - configure to allow to selectAt most 1asset andLimit file typesonly toAdjustable images-Content-Slug- URL slug element - auto-generated fromTitleelementAuthor- Linked items element - configure to acceptExactly 1item of typeAuthor
Save the content type.
The content type should look like this:

Fill content models with data
Go to Content & Assets section in your project and click Create new on the Content tab and select Author content type.
- You just need 1 author item first.
- Use dummy data for his name.
- For the image, you can download one from Unsplash.
Next, create another item based on Post content type:
- It's recommended to create at least 2 post items.
- Use dummy data for the text.
- For images, you can download them from Unsplash.
- Pick the author you created earlier.
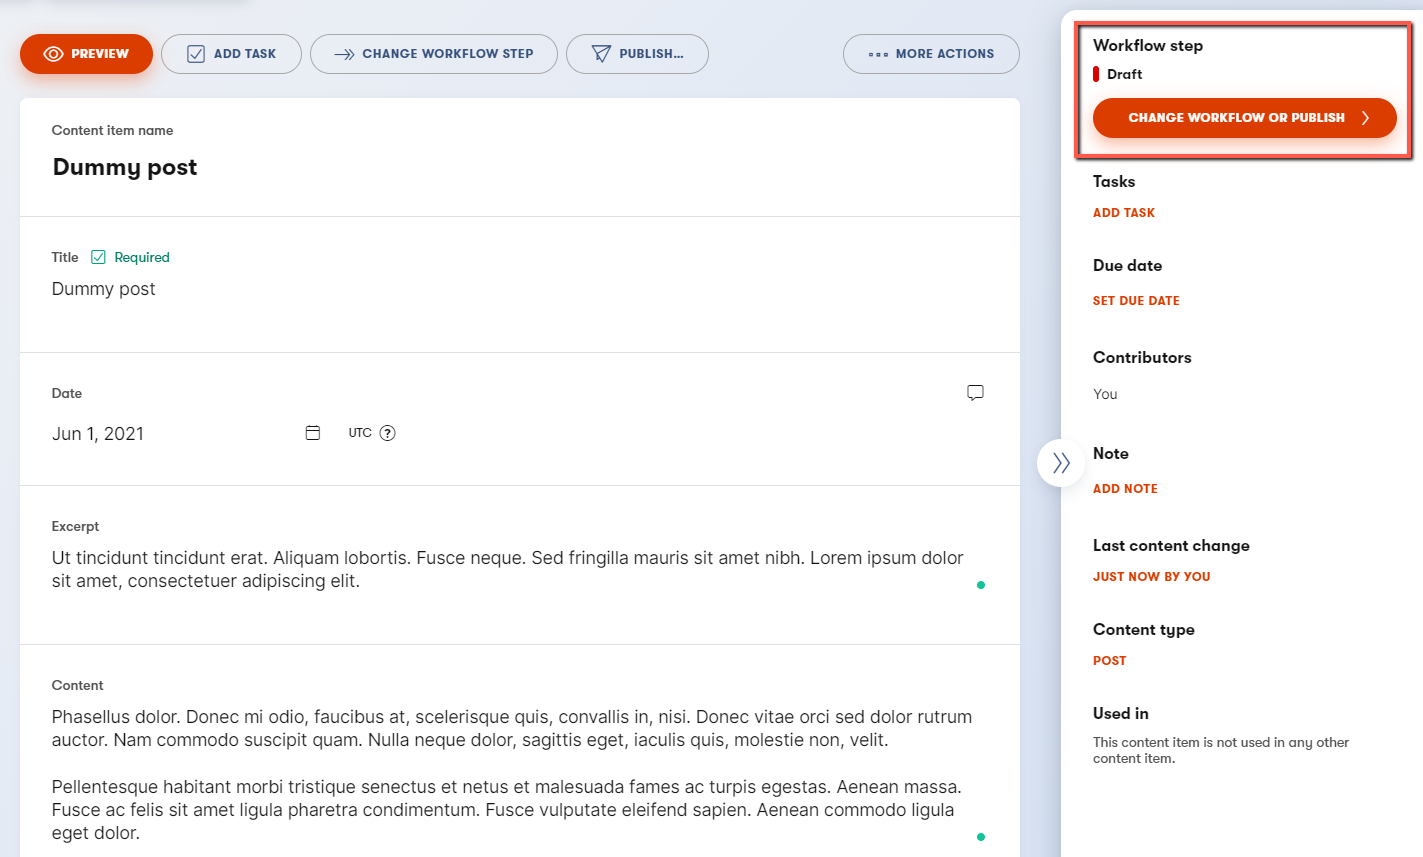
Important: For each item, you need to click on Publish. If not, the entry will be in the draft workflow step.
3. Set up environment variables
Copy the .env.local.example file in this directory to .env.local (which will be ignored by Git):
cp .env.local.example .env.local
Then set each variable on .env.local using the keys Project settings > API keys:
KONTENT_PROJECT_ID- Should be the Project ID inProject settings>API keys.KONTENT_PREVIEW_API_KEY- One of the Preview API keys inProject settings>API keys.KONTENT_PREVIEW_SECRET- Can be any random string (but avoid spaces), likeMY_SECRET- this is used for Preview Mode.
4. Run Next.js in development mode
npm install
npm run dev

# or

yarn
yarn dev
Your blog should be up and running on http://localhost:3000! If it doesn't work, post on GitHub discussions.
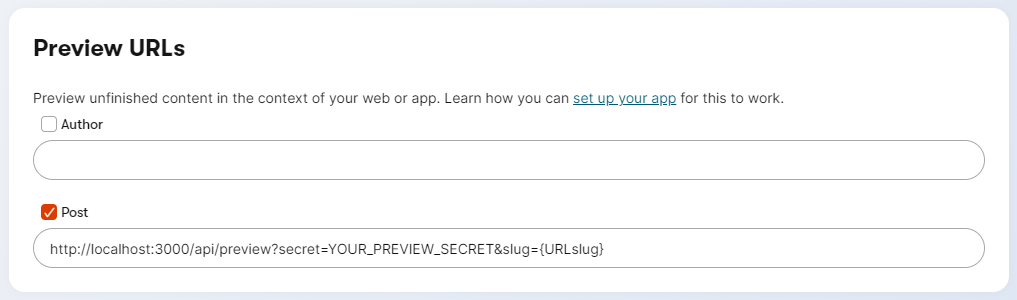
5. Try preview mode
In your Kontent.ai project, go to Project Settings > Preview URLs and set a new preview URL for the Post content type to:
http://localhost:3000/api/preview?secret=<KONTENT_PREVIEW_SECRET>&slug={URLslug}
Replace <KONTENT_PREVIEW_SECRET> with its respective value in .env.local:
Once saved, go to one of the posts you've created and:
- Create a new version of the post
- Update the title. For example, you can add
[Draft]in front of the title.Mind the title also regenerates the URL slug, if you want to change any other field that does not influence the URL slug, feel free to do so.
- Do not publish it. By not publishing it, the post will be in the draft workflow step.
- On the menu, you will see the Preview button. Click on it!
 .
.
You will now be able to see the updated title. To exit preview mode, you can click on Click here to exit preview mode at the top of the page.
6. Deploy on Vercel
You can deploy this app to the cloud with Vercel (Documentation).
Deploy Your Local Project
To deploy your local project to Vercel, push it to GitHub/GitLab/Bitbucket and import it to Vercel.
Important: When you import your project on Vercel, make sure to click on Environment Variables and set them to match your .env.local file.
Deploy from Our Template
Alternatively, you can deploy using our template by clicking on the Deploy button below.