<!--
Thanks for opening a PR! Your contribution is much appreciated.
In order to make sure your PR is handled as smoothly as possible we
request that you follow the checklist sections below.
Choose the right checklist for the change that you're making:
-->

This adds a new example under cms-dotcms/. Is a general-purpose example
that should allow developers to undestand how to use next.js with dotCMS
apis.

## Bug

- [ ] Related issues linked using `fixes #number`
- [ ] Integration tests added
- [ ] Errors have helpful link attached, see `contributing.md`

## Feature

- [ ] Implements an existing feature request or RFC. Make sure the
feature request has been accepted for implementation before opening a
PR.
- [ ] Related issues linked using `fixes #number`
- [ ] Integration tests added
- [x] Documentation added
- [ ] Telemetry added. In case of a feature if it's used or not.
- [ ] Errors have helpful link attached, see `contributing.md`

## Documentation / Examples

- [x] Make sure the linting passes by running `pnpm lint`
- [x] The examples guidelines are followed from [our contributing
doc](https://github.com/vercel/next.js/blob/canary/contributing.md#adding-examples)

Co-authored-by: Daniel Esteves <estevesd8@gmail.com>
Co-authored-by: Will Ezell <will@dotcms.com>
Co-authored-by: Arcadio Quintero A <oidacra@gmail.com>
Co-authored-by: Rafael <rjvelazco21@gmail.com>
402 lines
15 KiB
Markdown
402 lines
15 KiB
Markdown
# A statically generated blog example using Next.js and Sanity
|
||
|
||
This example showcases Next.js's [Static Generation](https://nextjs.org/docs/basic-features/pages) feature using [Sanity](https://www.sanity.io/) as the data source.
|
||
|
||
You'll get:
|
||
|
||
- Next.js deployed with the [Sanity Vercel Integration][integration].
|
||
- Sanity Studio running on localhost and deployed in the [cloud](https://www.sanity.io/docs/deployment).
|
||
- Sub-second as-you-type previews in Next.js
|
||
- [On-demand revalidation of pages](https://nextjs.org/blog/next-12-1#on-demand-incremental-static-regeneration-beta) with [GROQ powered webhooks](https://www.sanity.io/docs/webhooks)
|
||
|
||
## Demo
|
||
|
||
### [https://next-blog-sanity.vercel.app](https://next-blog-sanity.vercel.app)
|
||
|
||
## Related examples
|
||
|
||
- [WordPress](/examples/cms-wordpress)
|
||
- [DatoCMS](/examples/cms-datocms)
|
||
- [TakeShape](/examples/cms-takeshape)
|
||
- [Prismic](/examples/cms-prismic)
|
||
- [Contentful](/examples/cms-contentful)
|
||
- [Strapi](/examples/cms-strapi)
|
||
- [Agility CMS](/examples/cms-agilitycms)
|
||
- [Cosmic](/examples/cms-cosmic)
|
||
- [ButterCMS](/examples/cms-buttercms)
|
||
- [Storyblok](/examples/cms-storyblok)
|
||
- [GraphCMS](/examples/cms-graphcms)
|
||
- [Kontent](/examples/cms-kontent)
|
||
- [Ghost](/examples/cms-ghost)
|
||
- [Umbraco Heartcore](/examples/cms-umbraco-heartcore)
|
||
- [Blog Starter](/examples/blog-starter)
|
||
- [Builder.io](/examples/cms-builder-io)
|
||
- [DotCMS](/examples/cms-dotcms)
|
||
- [Enterspeed](/examples/cms-enterspeed)
|
||
|
||
# Configuration
|
||
|
||
- [Step 1. Set up the environment](#step-1-set-up-the-environment)
|
||
- [Step 2. Configure CORS for localhost](#step-2-configure-cors-for-localhost)
|
||
- [Step 3. Run Next.js locally in development mode](#step-3-run-nextjs-locally-in-development-mode)
|
||
- [Step 4. Populate content](#step-4-populate-content)
|
||
- [Step 5. Deploy to production & use Preview Mode from anywhere](#step-5-deploy-to-production--use-preview-mode-from-anywhere)
|
||
- [If you didn't Deploy with Vercel earlier do so now](#if-you-didnt-deploy-with-vercel-earlier-do-so-now)
|
||
- [Configure CORS for production](#configure-cors-for-production)
|
||
- [Add the preview secret environment variable](#add-the-preview-secret-environment-variable)
|
||
- [How to test locally that the secret is setup correctly](#how-to-test-locally-that-the-secret-is-setup-correctly)
|
||
- [How to start Preview Mode for Next.js in production from a local Studio](#how-to-start-preview-mode-for-nextjs-in-production-from-a-local-studio)
|
||
- [If you regret sending a preview link to someone](#if-you-regret-sending-a-preview-link-to-someone)
|
||
- [Step 6. Deploy your Studio and publish from anywhere](#step-6-deploy-your-studio-and-publish-from-anywhere)
|
||
- [Step 7. Setup Revalidation Webhook](#step-7-setup-revalidation-webhook)
|
||
- [Testing the Webhook](#testing-the-webhook)
|
||
- [Next steps](#next-steps)
|
||
|
||
## Step 1. Set up the environment
|
||
|
||
Use the Deploy Button below, you'll deploy the example using [Vercel](https://vercel.com?utm_source=github&utm_medium=readme&utm_campaign=next-example) as well as connect it to your Sanity dataset using [the Sanity Vercel Integration][integration].
|
||
|
||
[][vercel-deploy]
|
||
|
||
[Clone the repository](https://docs.github.com/en/repositories/creating-and-managing-repositories/cloning-a-repository) that Vercel created for you and from the root directory of your local checkout.
|
||
Then link your clone to Vercel:
|
||
|
||
```bash
|
||
npx vercel link
|
||
```
|
||
|
||
Download the environment variables needed to connect Next.js and Studio to your Sanity project:
|
||
|
||
```bash
|
||
npx vercel env pull
|
||
```
|
||
|
||
<details>
|
||
<summary>You can also set up manually</summary>
|
||
|
||
- [Bootstrap the example](#bootstrap-the-example)
|
||
- [Connect to a Sanity project](#connect-to-a-sanity-project)
|
||
- [Set up environment variables](#set-up-environment-variables)
|
||
|
||
If using the [integration] isn't an option. Or maybe you want to work locally first and deploy to Vercel later. Whatever the reason this guide shows you how to setup manually.
|
||
|
||
### Bootstrap the example
|
||
|
||
Execute [`create-next-app`](https://github.com/vercel/next.js/tree/canary/packages/create-next-app) with [npm](https://docs.npmjs.com/cli/init), [Yarn](https://yarnpkg.com/lang/en/docs/cli/create/), or [pnpm](https://pnpm.io):
|
||
|
||
```bash
|
||
npx create-next-app --example cms-sanity cms-sanity-app
|
||
```
|
||
|
||
```bash
|
||
yarn create next-app --example cms-sanity cms-sanity-app
|
||
```
|
||
|
||
```bash
|
||
pnpm create next-app --example cms-sanity cms-sanity-app
|
||
```
|
||
|
||
### Connect to a Sanity project
|
||
|
||
Run this to select from your existing Sanity projects, or create a new one:
|
||
|
||
```bash
|
||
(cd studio && npx @sanity/cli init)
|
||
```
|
||
|
||
The CLI will update [`sanity.json`] with the project ID and dataset name.
|
||
|
||
### Set up environment variables
|
||
|
||
Copy the [`.env.local.example`] file in this directory to `.env.local` (which will be ignored by Git):
|
||
|
||
```bash
|
||
cp .env.local.example .env.local
|
||
```
|
||
|
||
Then set these variables in `.env.local`:
|
||
|
||
- `NEXT_PUBLIC_SANITY_PROJECT_ID` should be the `projectId` value from [`sanity.json`].
|
||
- `NEXT_PUBLIC_SANITY_DATASET` should be the `dataset` value from [`sanity.json`].
|
||
- `SANITY_API_READ_TOKEN` create an API token with `read-only` permissions:
|
||
- Run this to open your project settings or go to https://manage.sanity.io/ and open your project:
|
||
```bash
|
||
(cd studio && npx @sanity/cli manage)
|
||
```
|
||
- Go to **API** and the **Tokens** section at the bottom, launch its **Add API token** button.
|
||
- Name it `SANITY_API_READ_TOKEN`, set **Permissions** to `Viewer`.
|
||
- Hit **Save** and you can copy/paste the token.
|
||
|
||
Your `.env.local` file should look like this:
|
||
|
||
```bash
|
||
NEXT_PUBLIC_SANITY_PROJECT_ID=...
|
||
NEXT_PUBLIC_SANITY_DATASET=...
|
||
SANITY_API_READ_TOKEN=...
|
||
```
|
||
|
||
</details>
|
||
|
||
## Step 2. Configure CORS for localhost
|
||
|
||
Needed for live previewing unpublished/draft content.
|
||
|
||
```bash
|
||
npm --prefix studio run cors:add -- http://localhost:3000 --credentials
|
||
```
|
||
|
||
## Step 3. Run Next.js locally in development mode
|
||
|
||
```bash
|
||
npm install && npm run dev
|
||
```
|
||
|
||
```bash
|
||
yarn install && yarn dev
|
||
```
|
||
|
||
Your blog should be up and running on [http://localhost:3000](http://localhost:3000)! If it doesn't work, post on [GitHub discussions](https://github.com/vercel/next.js/discussions).
|
||
|
||
## Step 4. Populate content
|
||
|
||
In another terminal start up the studio:
|
||
|
||
```bash
|
||
npm run studio:dev
|
||
```
|
||
|
||
Your studio should be up and running on [http://localhost:3333](http://localhost:3333)!
|
||
|
||
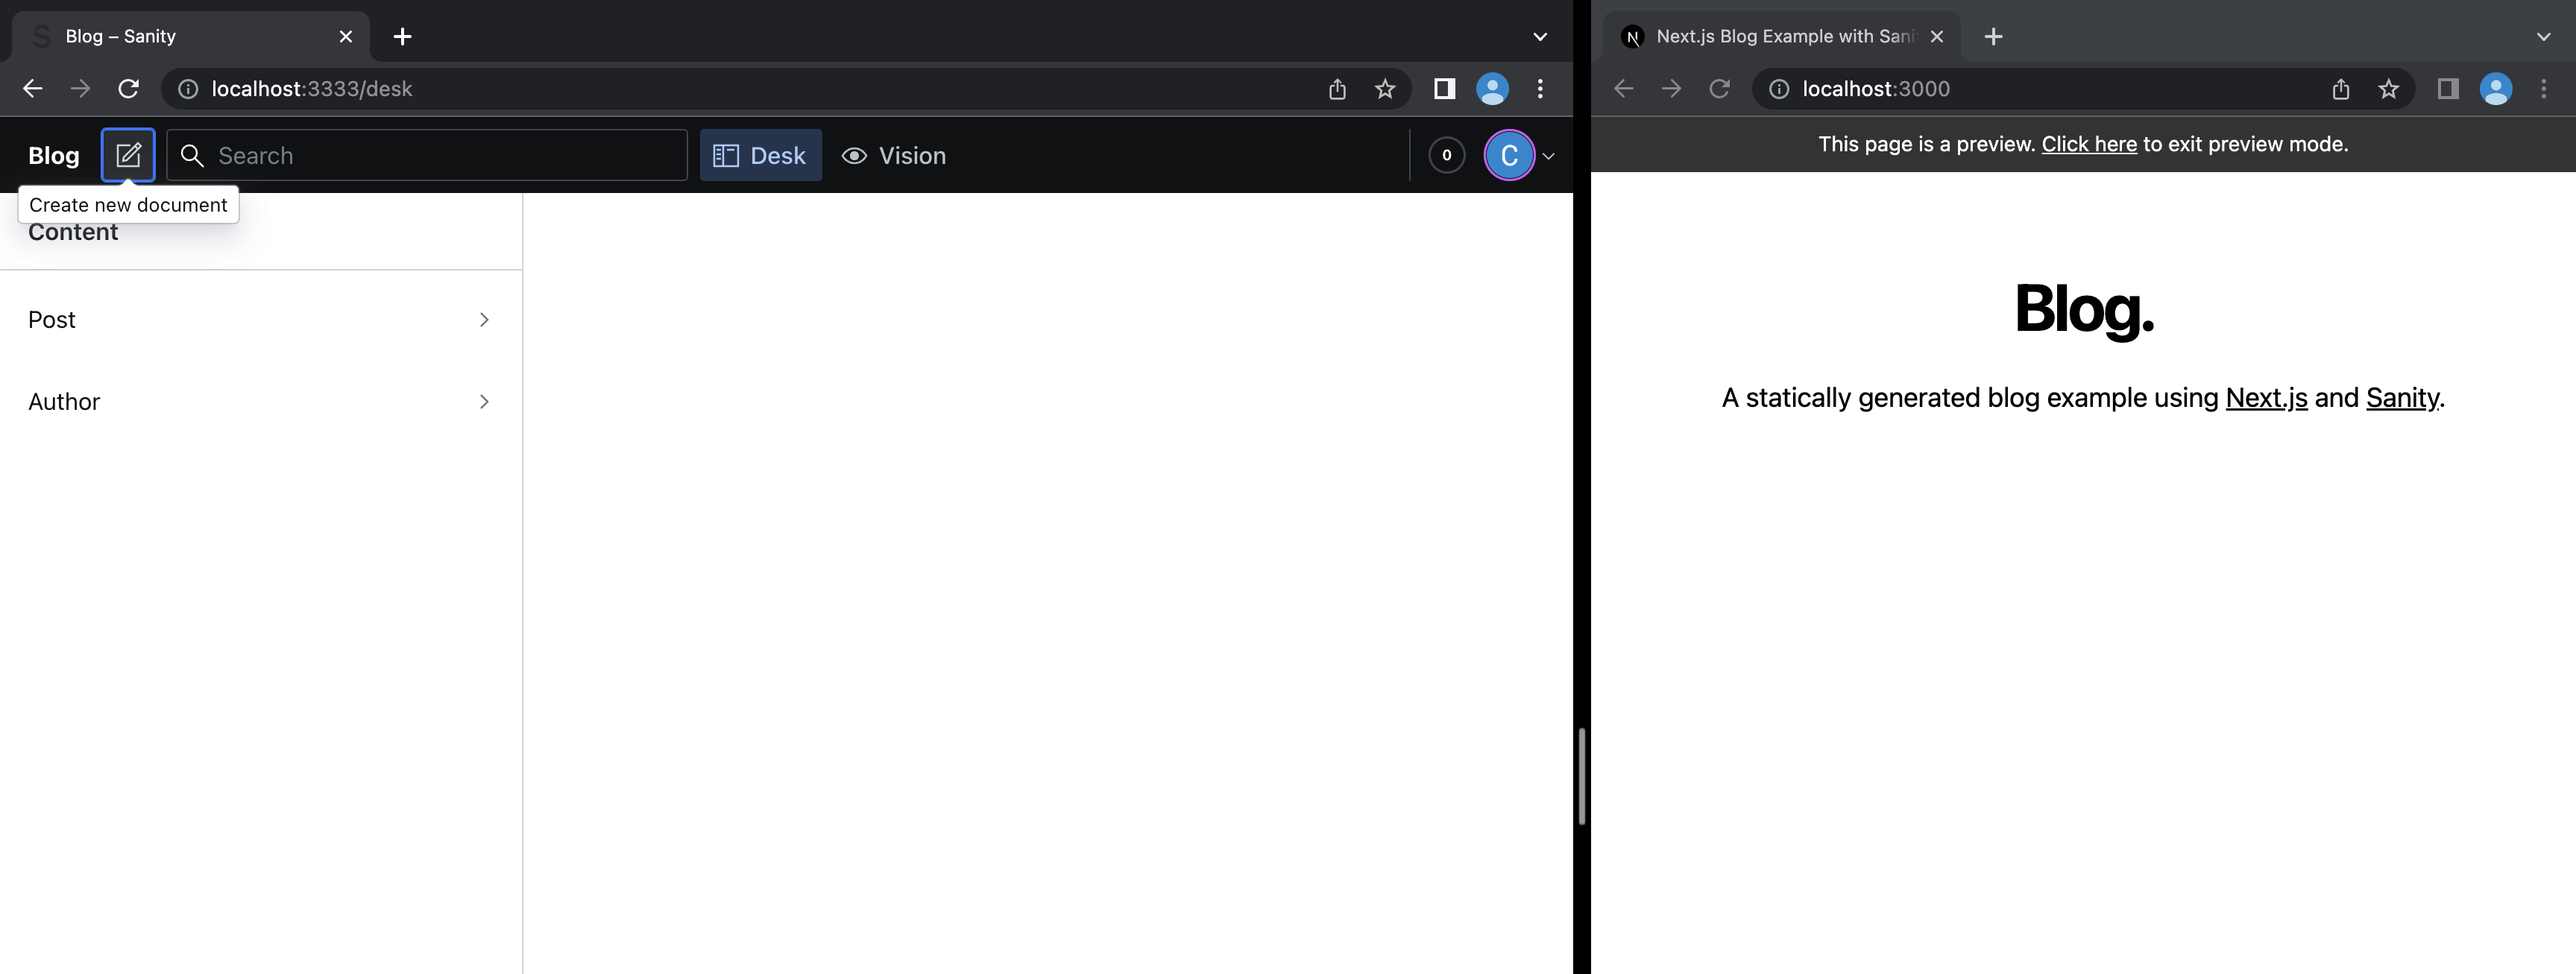
Create content in Sanity Studio and live preview it in Next.js, side-by-side, by opening these URLs:
|
||
|
||
- [`http://localhost:3333`](http://localhost:3333)
|
||
- [`http://localhost:3000/api/preview`](http://localhost:3000/api/preview)
|
||
|
||
<details>
|
||
<summary>View screenshot ✨</summary>
|
||
|
||
|
||
|
||
</details>
|
||
|
||
We're all set to do some content creation!
|
||
|
||
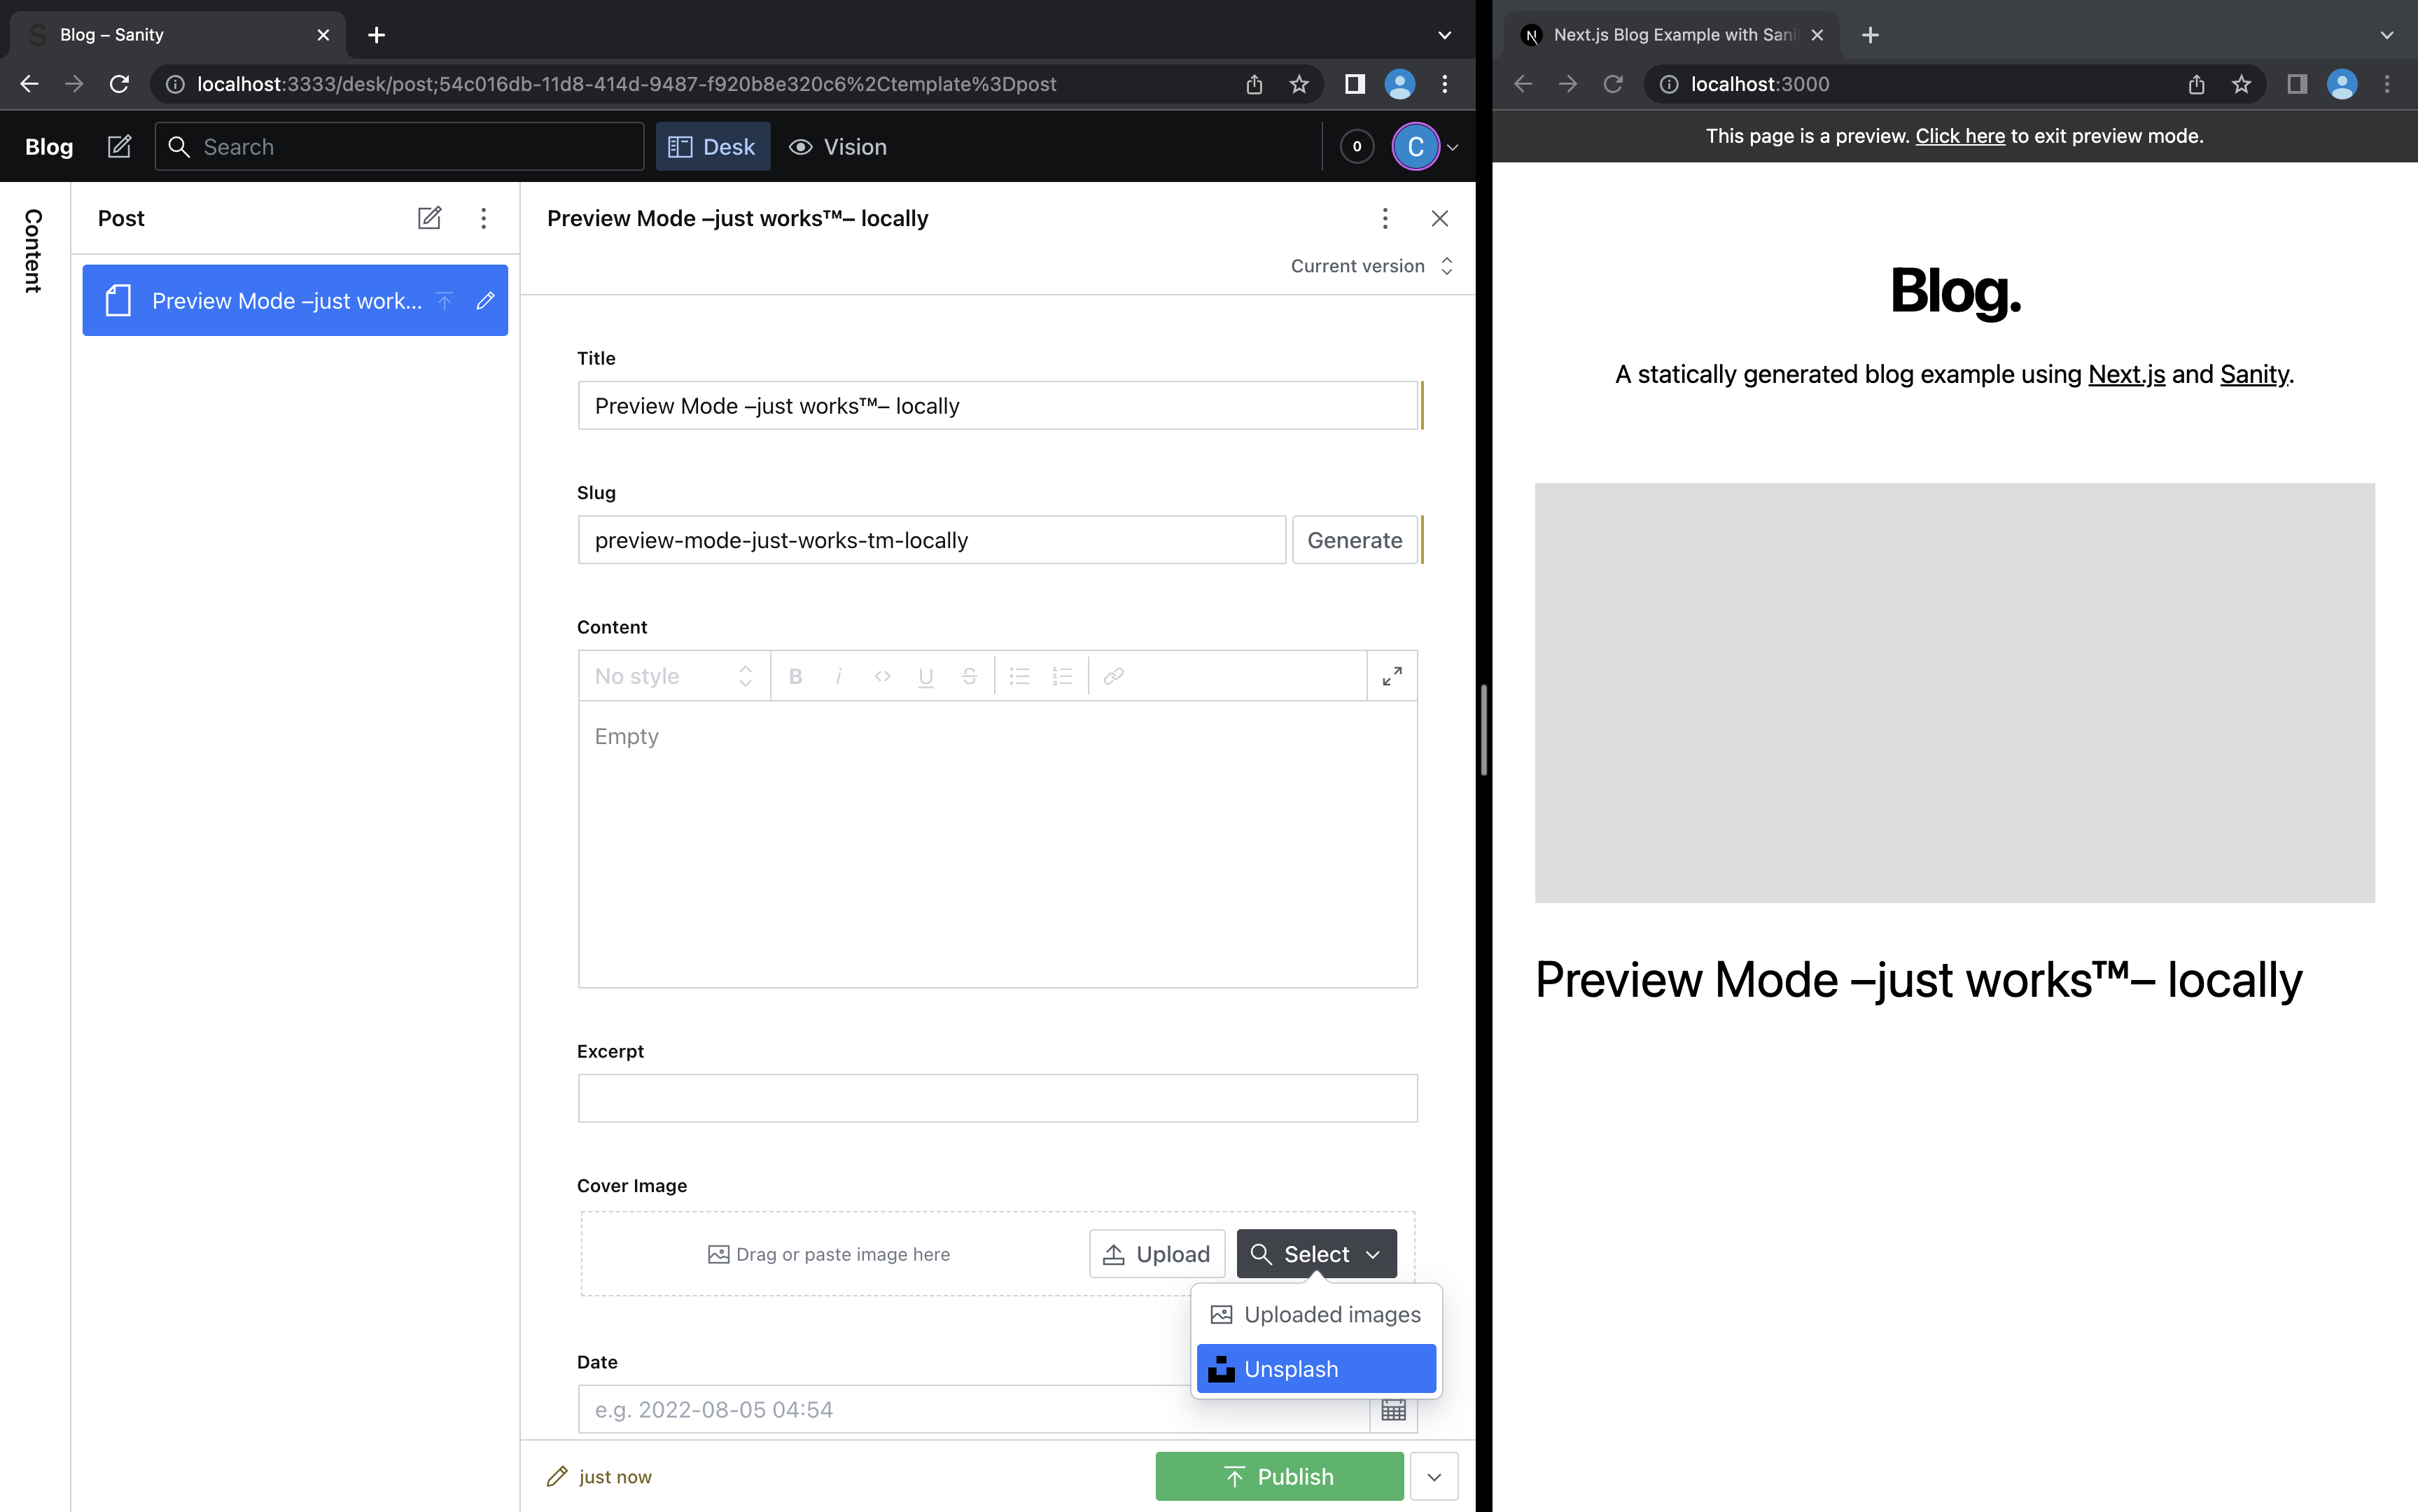
- Click on the **"Create new document"** button top left and select **Post**
|
||
- Type some dummy data for the **Title**
|
||
- **Generate** a **Slug**
|
||
<details>
|
||
<summary>View screenshot ✨</summary>
|
||
|
||
|
||
|
||
</details>
|
||
|
||
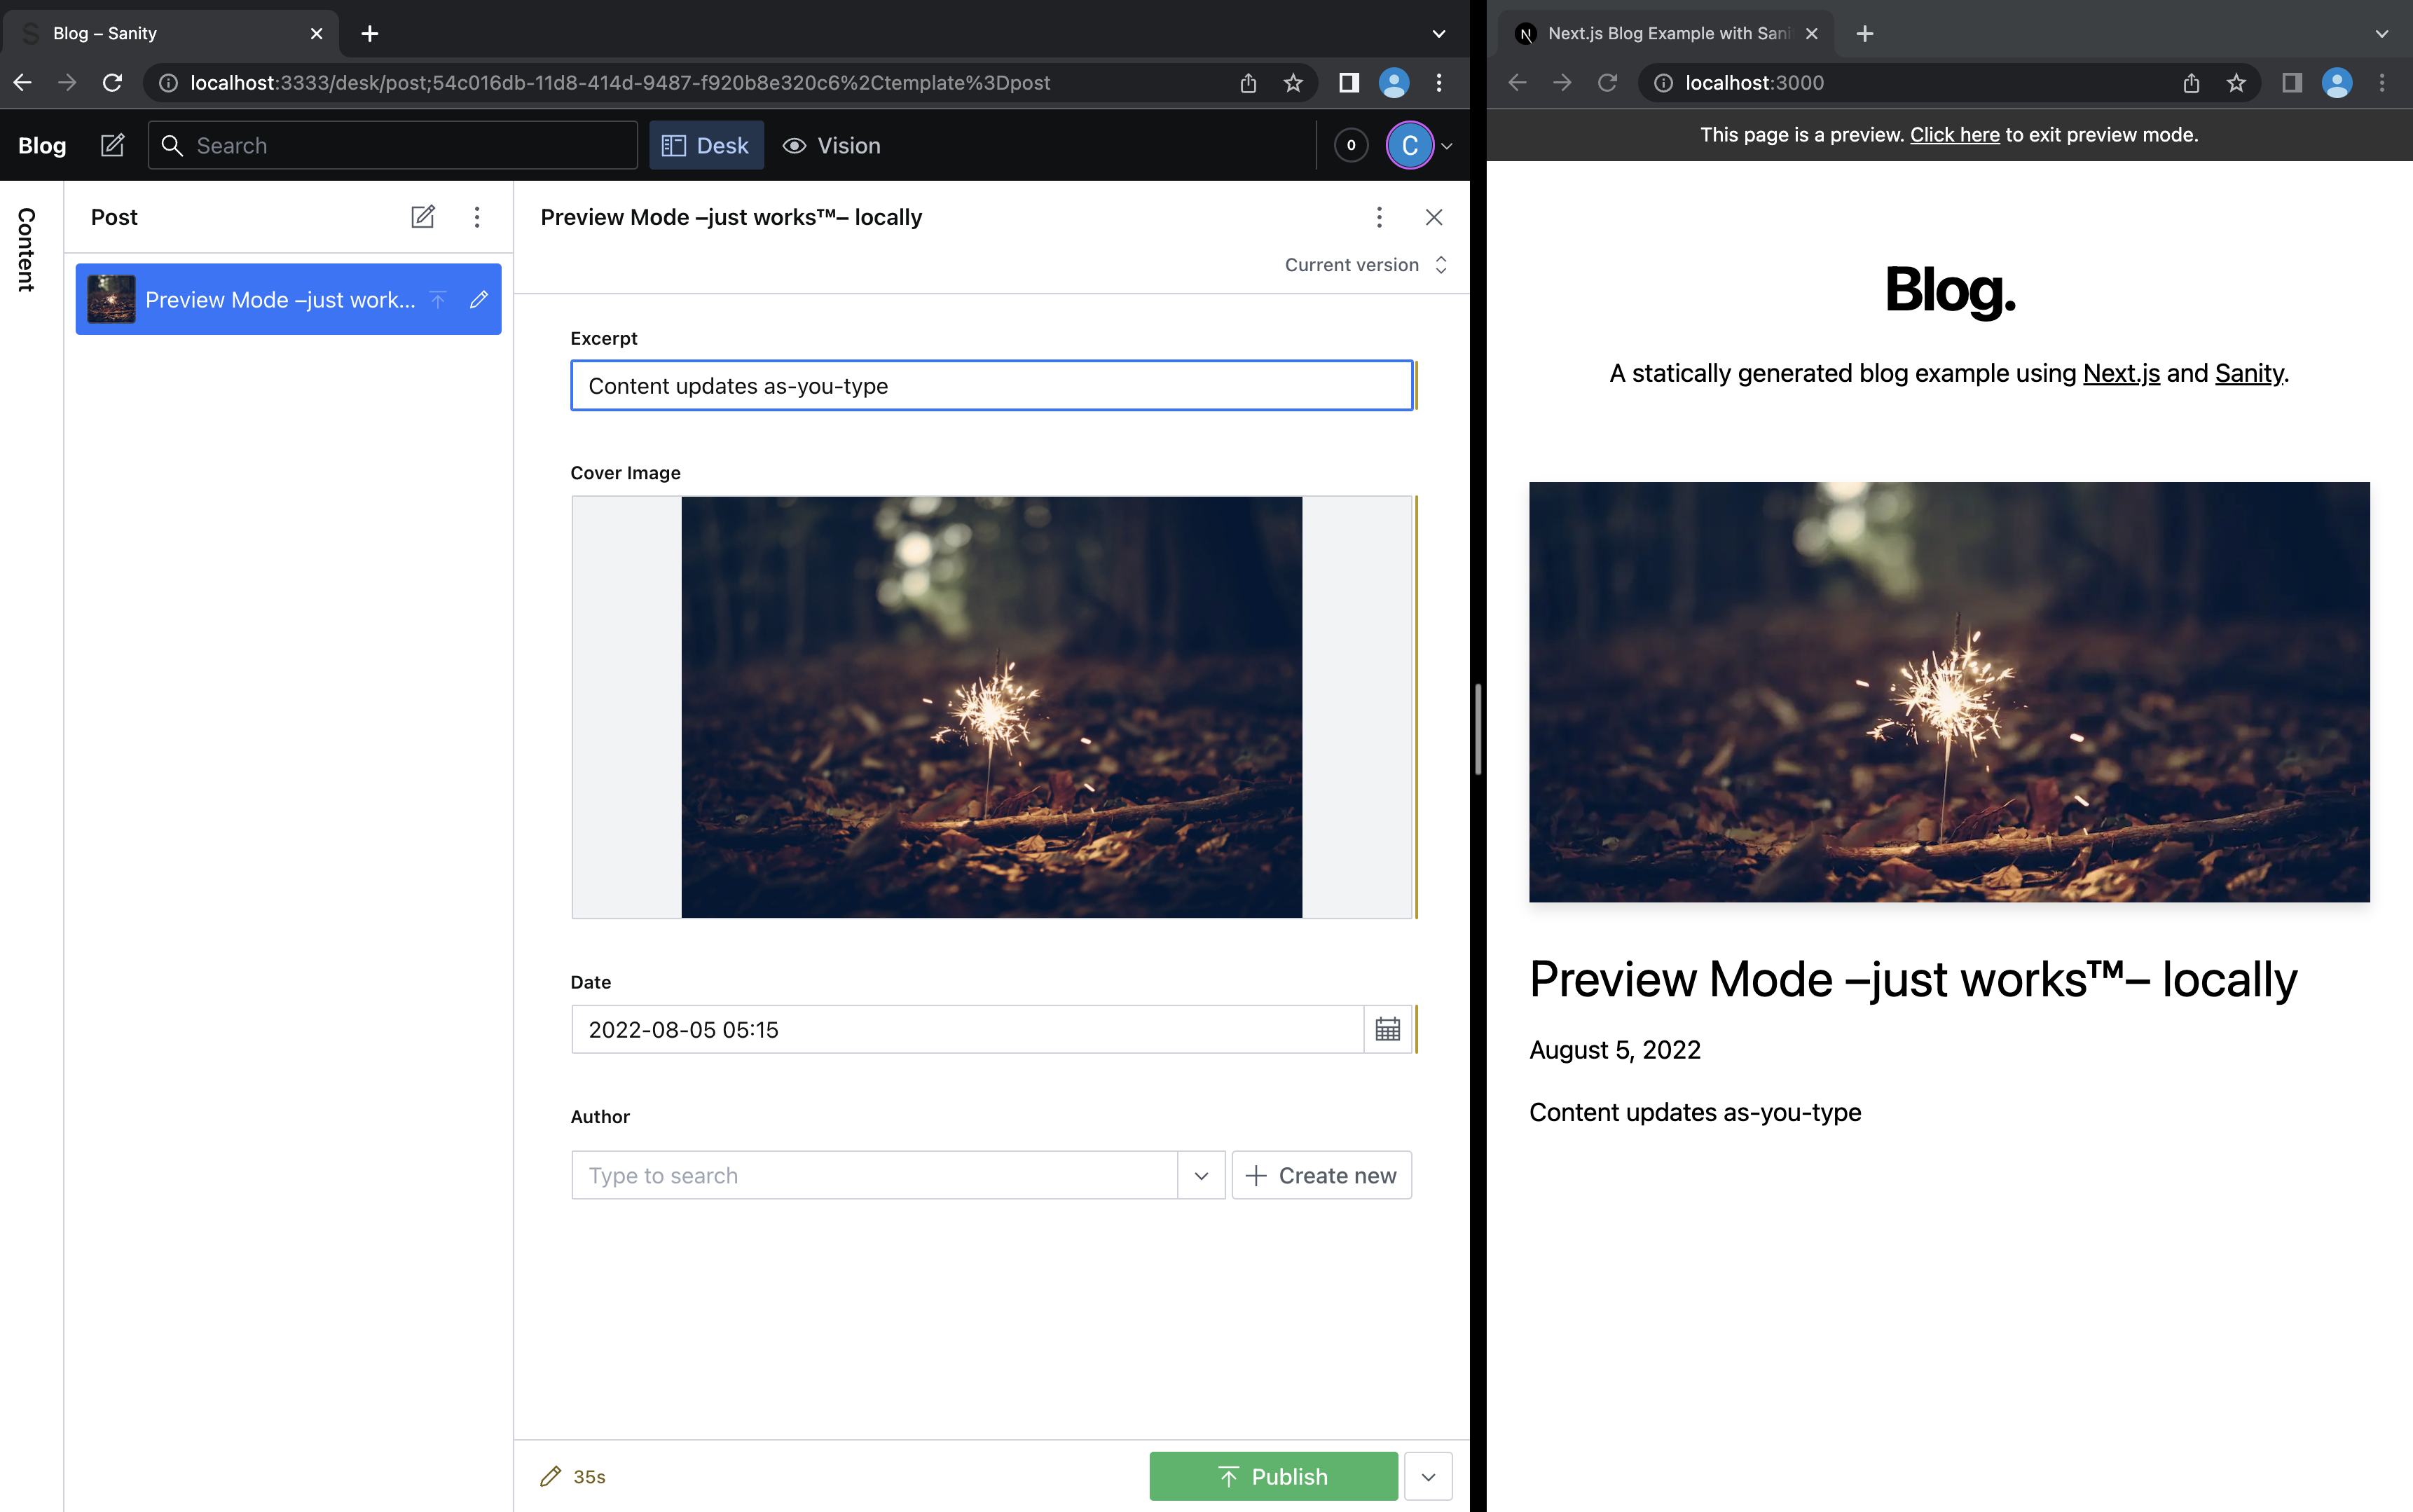
- Set the **Date**
|
||
- Select a **Cover Image** from [Unsplash].
|
||
<details>
|
||
<summary>View screenshot ✨</summary>
|
||
|
||
|
||
|
||
</details>
|
||
|
||
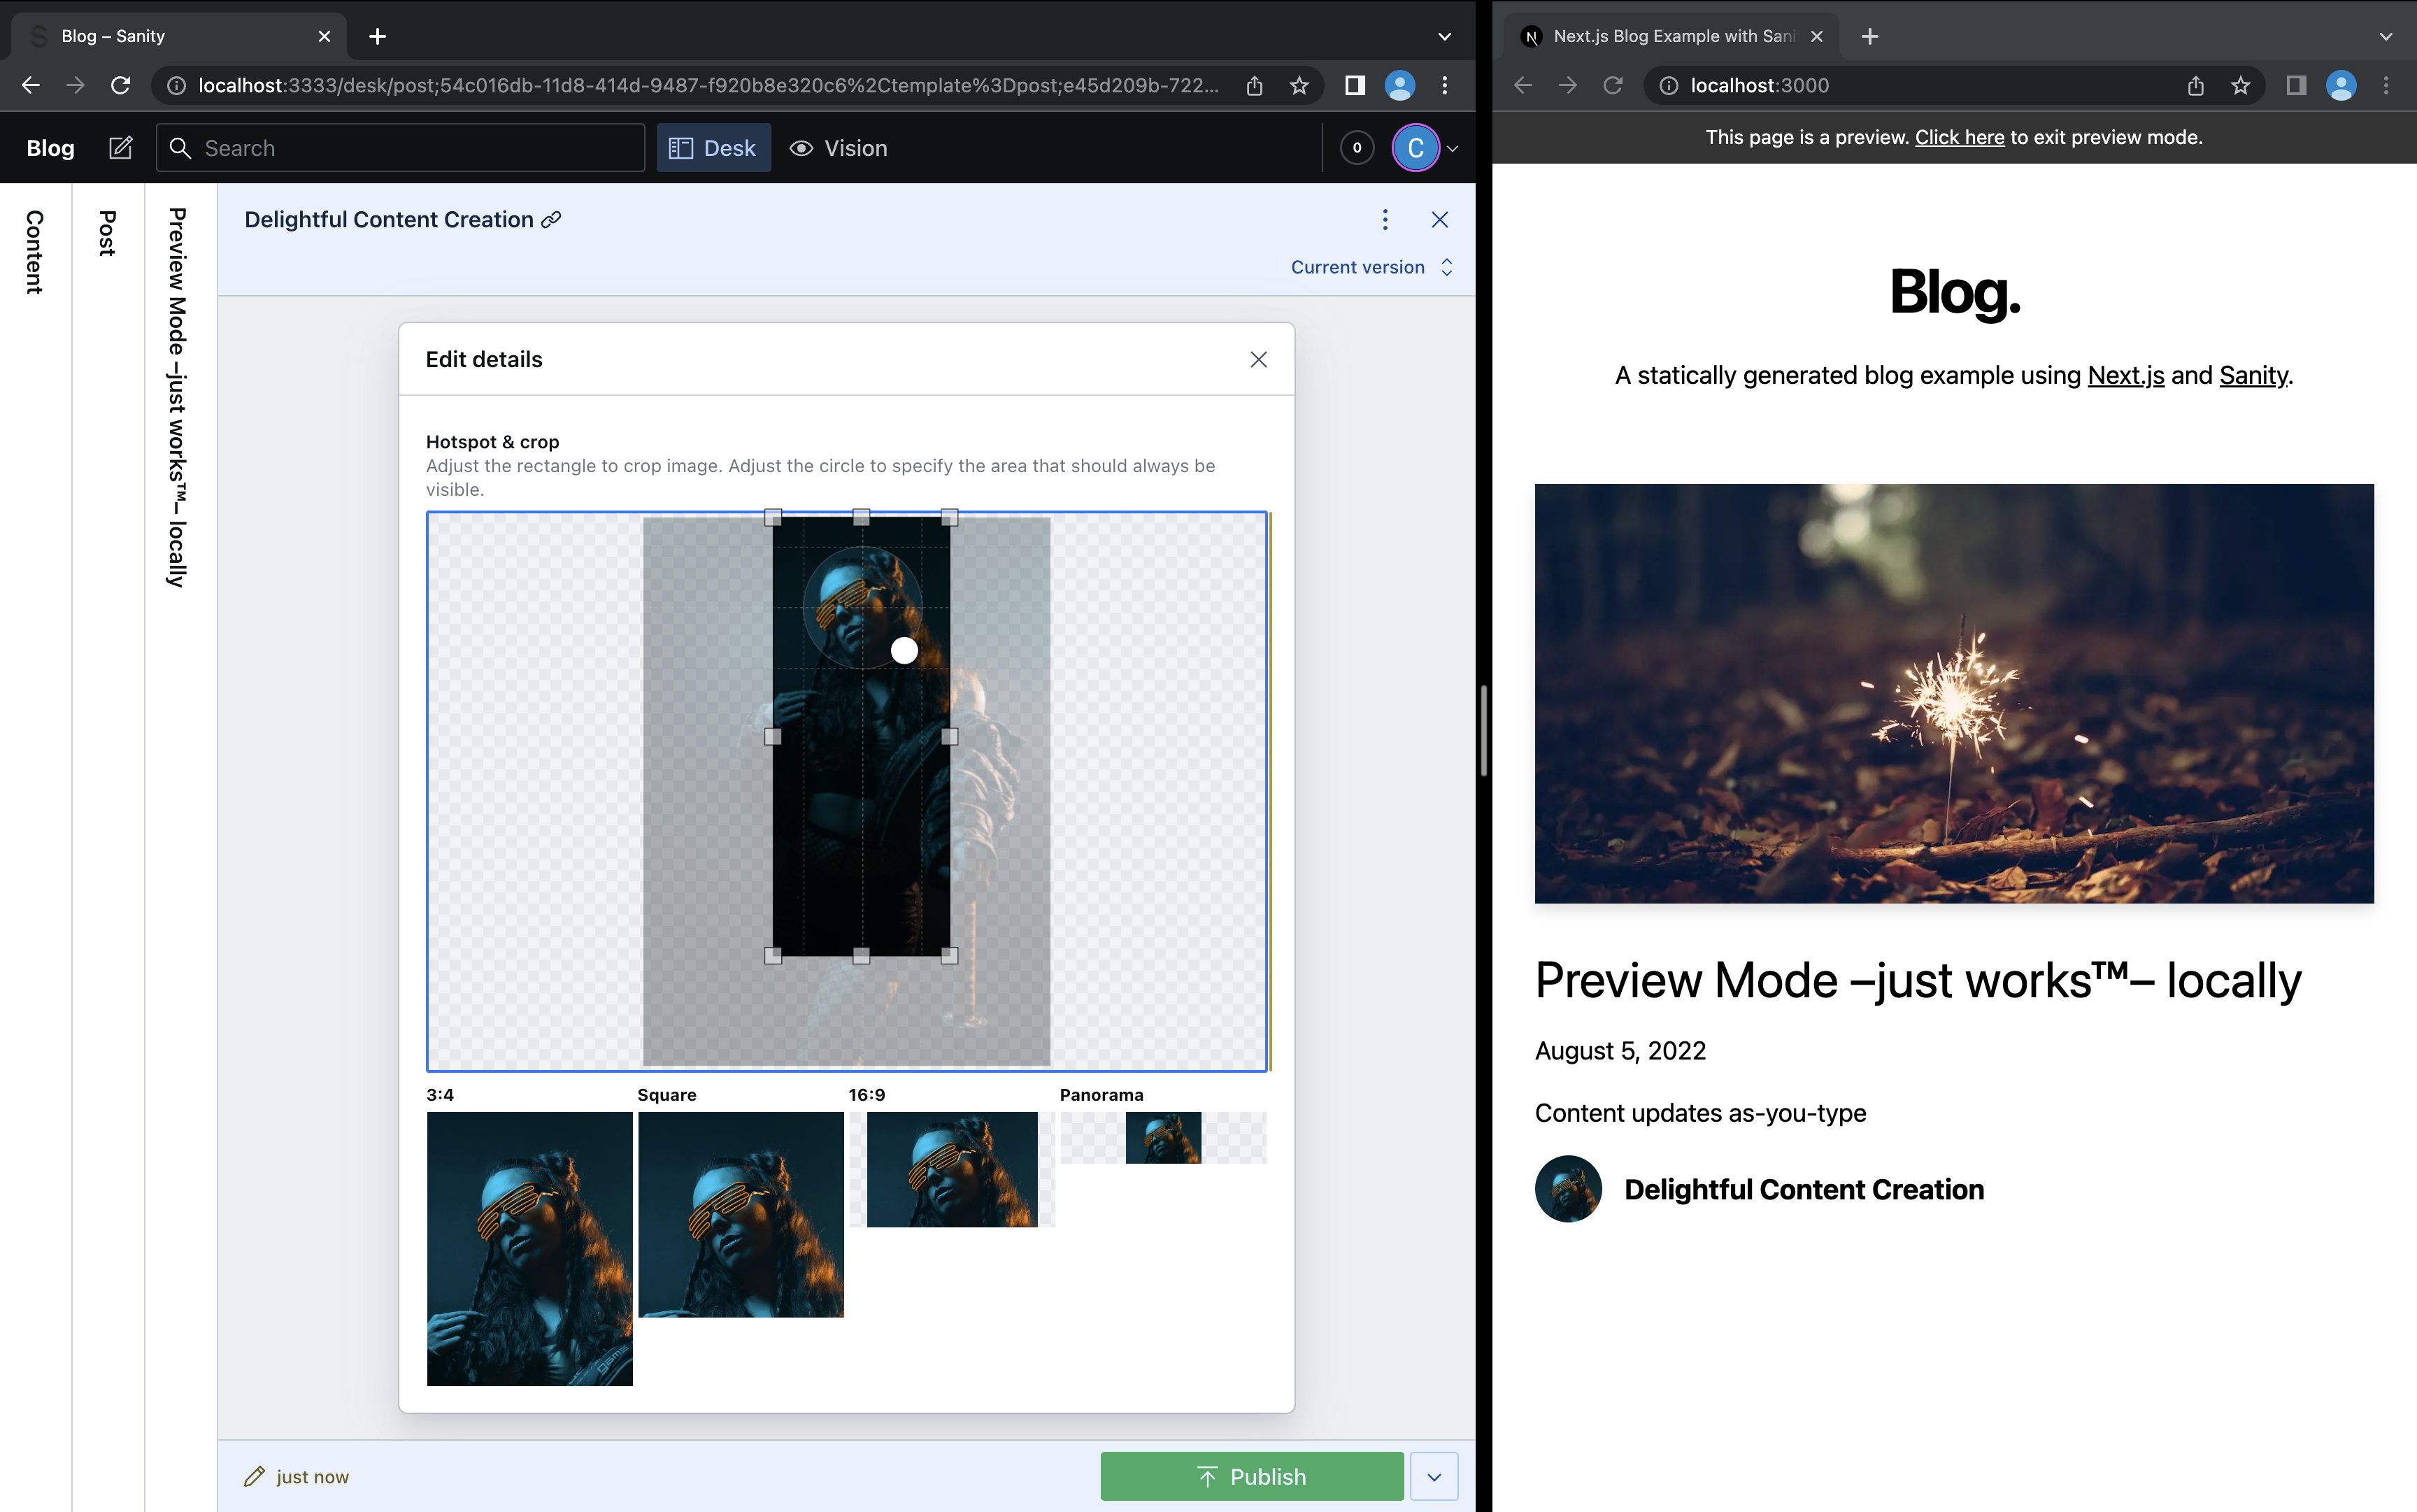
- Let's create an **Author** inline, click **Create new**.
|
||
- Give the **Author** a **Name**.
|
||
- After selecting a **Picture** of a **face** from [Unsplash], set a hotspot to ensure pixel-perfect cropping.
|
||
<details>
|
||
<summary>View screenshot ✨</summary>
|
||
|
||
|
||
|
||
</details>
|
||
|
||
- Create a couple more **Posts** and watch how the layout adapt to more content.
|
||
|
||
**Important:** For each post record, you need to click **Publish** after saving for it to be visible outside Preview Mode.
|
||
|
||
To exit Preview Mode, you can click on _"Click here to exit preview mode"_ at the top.
|
||
|
||
## Step 5. Deploy to production & use Preview Mode from anywhere
|
||
|
||
### If you didn't [Deploy with Vercel earlier](#step-1-set-up-the-environment) do so now
|
||
|
||
To deploy your local project to Vercel, push it to [GitHub](https://docs.github.com/en/get-started/importing-your-projects-to-github/importing-source-code-to-github/adding-locally-hosted-code-to-github)/GitLab/Bitbucket and [import to Vercel](https://vercel.com/new?utm_source=github&utm_medium=readme&utm_campaign=next-example).
|
||
|
||
**Important**: When you import your project on Vercel, make sure to click on **Environment Variables** and set them to match your `.env.local` file.
|
||
|
||
After it's deployed link your local code to the Vercel project:
|
||
|
||
```bash
|
||
npx vercel link
|
||
```
|
||
|
||
### Configure CORS for production
|
||
|
||
Add your `production url` to the list over CORS origins.
|
||
|
||
<details>
|
||
<summary>Don't remember the production url? 🤔</summary>
|
||
|
||
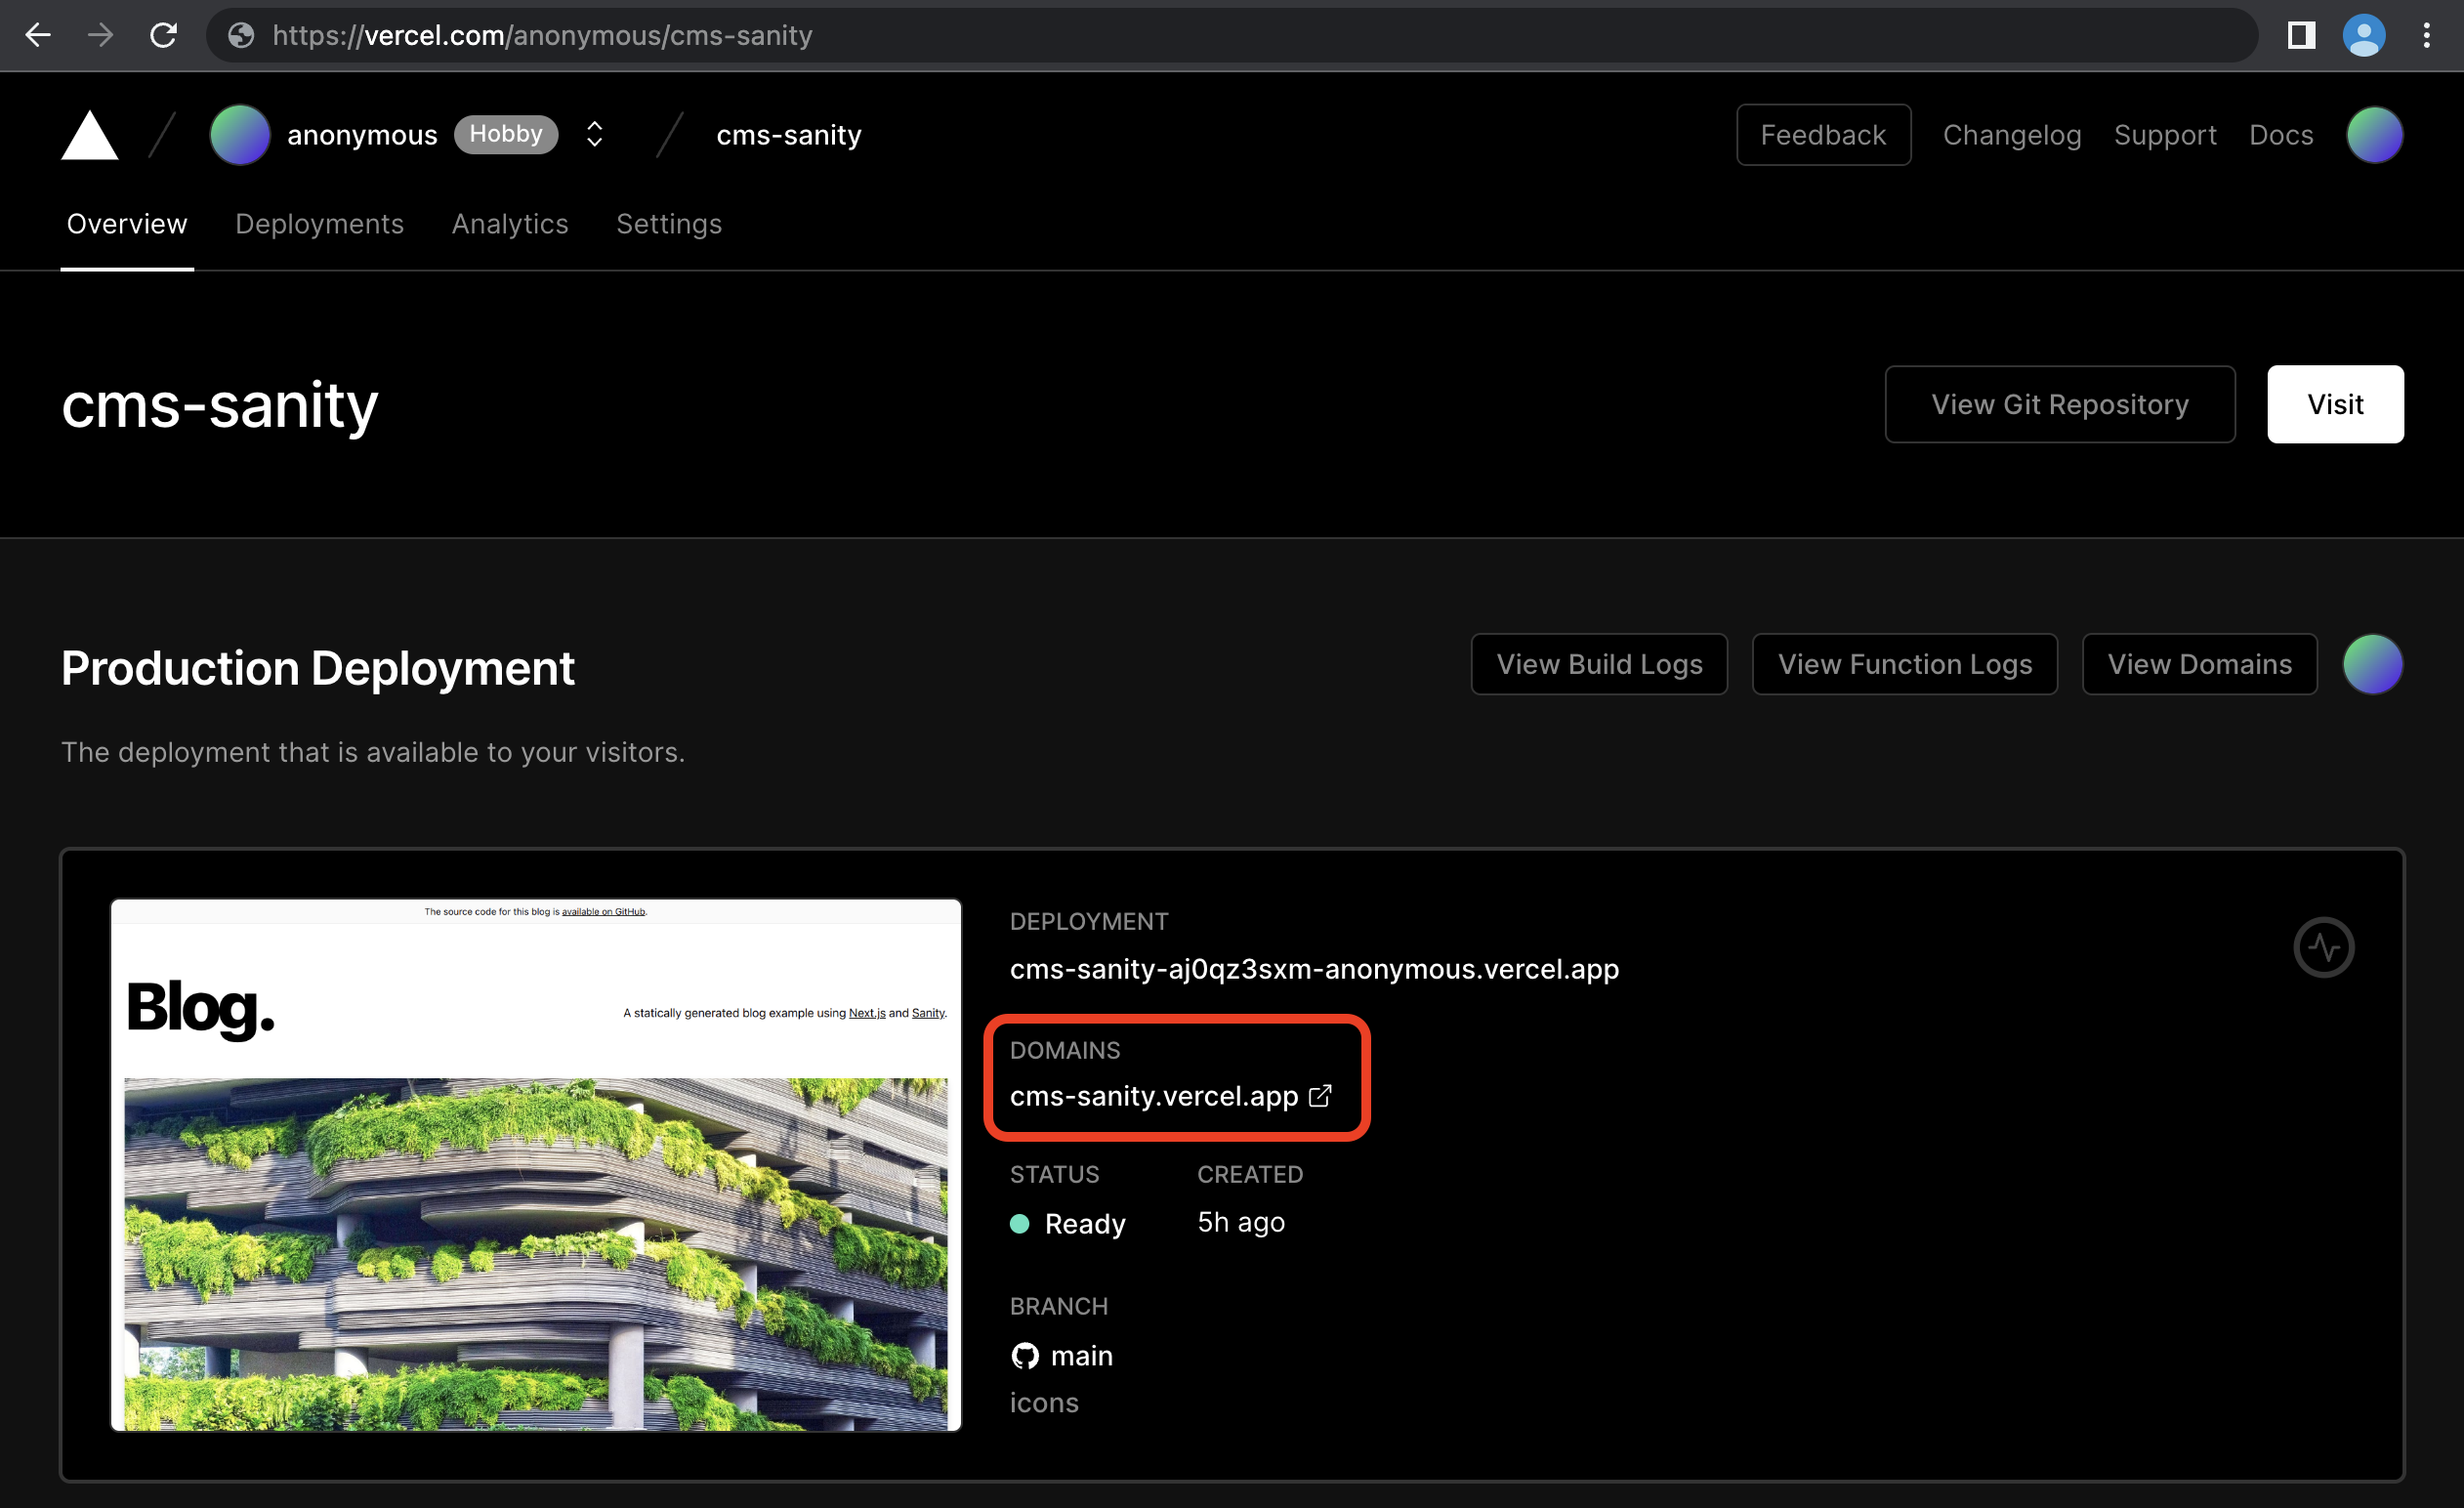
No worries, it's easy to find out. Go to your [Vercel Dashboard](https://vercel.com/) and click on your project:
|
||
|
||
|
||
|
||
In the screenshot above the `production url` is `https://cms-sanity.vercel.app`.
|
||
|
||
</details>
|
||
|
||
```bash
|
||
npm --prefix studio run cors:add -- [your production url] --credentials
|
||
```
|
||
|
||
### Add the preview secret environment variable
|
||
|
||
It's required to set a secret that makes Preview Mode activation links unique. Otherwise anyone could see your unpublished content by just opening `[your production url]/api/preview`.
|
||
Run this and it'll prompt you for a value:
|
||
|
||
```bash
|
||
npx vercel env add SANITY_STUDIO_PREVIEW_SECRET
|
||
```
|
||
|
||
The secret can be any combination of random words and letters as long as it's URL safe.
|
||
You can generate one in your DevTools console using `copy(Math.random().toString(36).substr(2, 10))` if you don't feel like inventing one.
|
||
|
||
You should see something like this in your terminal afterwards:
|
||
|
||
```bash
|
||
$ npx vercel env add SANITY_STUDIO_PREVIEW_SECRET
|
||
Vercel CLI 27.3.7
|
||
? What’s the value of SANITY_STUDIO_PREVIEW_SECRET? 2whpu1jefs
|
||
? Add SANITY_STUDIO_PREVIEW_SECRET to which Environments (select multiple)? Production, Preview, Development
|
||
✅ Added Environment Variable SANITY_STUDIO_PREVIEW_SECRET to Project cms-sanity [1s]
|
||
```
|
||
|
||
Redeploy production to apply the secret to the preview api:
|
||
|
||
```bash
|
||
npx vercel --prod
|
||
```
|
||
|
||
After it deploys it should now start preview mode if you launch `[your production url]/api/preview?secret=[your preview secret]`. You can send that preview url to people you want to show the content you're working on before you publish it.
|
||
|
||
### How to test locally that the secret is setup correctly
|
||
|
||
In order to test that the secret will prevent unauthorized people from activating preview mode, start by updating the local `.env` with the secret you just made:
|
||
|
||
```bash
|
||
npx vercel env pull
|
||
```
|
||
|
||
Restart your Next.js and Studio processes so the secret is applied:
|
||
|
||
```bash
|
||
npm run dev
|
||
```
|
||
|
||
```bash
|
||
npm run studio:dev
|
||
```
|
||
|
||
And now you'll get an error if `[secret]` is incorrect when you try to open `https://localhost:3000/api/preview?secret=[secret]`.
|
||
|
||
### How to start Preview Mode for Next.js in production from a local Studio
|
||
|
||
Run this to make the Studio open previews at `[your production url]/api/preview` instead of `http://localhost:3000/api/preview`
|
||
|
||
```bash
|
||
SANITY_STUDIO_PREVIEW_URL=[your production url] npm run studio:dev
|
||
```
|
||
|
||
### If you regret sending a preview link to someone
|
||
|
||
Revoke their access by creating a new secret:
|
||
|
||
```bash
|
||
npx vercel env rm SANITY_STUDIO_PREVIEW_SECRET
|
||
npx vercel env add SANITY_STUDIO_PREVIEW_SECRET
|
||
npx vercel --prod
|
||
```
|
||
|
||
## Step 6. Deploy your Studio and publish from anywhere
|
||
|
||
Live previewing content is fun, but collaborating on content in real-time is next-level:
|
||
|
||
```bash
|
||
SANITY_STUDIO_PREVIEW_URL=[your production url] npm run studio:deploy
|
||
```
|
||
|
||
If it's successful you should see something like this in your terminal:
|
||
|
||
```bash
|
||
SANITY_STUDIO_PREVIEW_URL="https://cms-sanity.vercel.app" npm run studio:deploy
|
||
? Studio hostname (<value>.sanity.studio): cms-sanity
|
||
|
||
Including the following environment variables as part of the JavaScript bundle:
|
||
- SANITY_STUDIO_PREVIEW_URL
|
||
- SANITY_STUDIO_PREVIEW_SECRET
|
||
- SANITY_STUDIO_API_PROJECT_ID
|
||
- SANITY_STUDIO_API_DATASET
|
||
|
||
✔ Deploying to Sanity.Studio
|
||
|
||
Success! Studio deployed to https://cms-sanity.sanity.studio/
|
||
```
|
||
|
||
This snippet is stripped from verbose information, you'll see a lot of extra stuff in your terminal.
|
||
|
||
## Step 7. Setup Revalidation Webhook
|
||
|
||
Using GROQ Webhooks Next.js can rebuild pages that have changed content. It rebuilds so fast it can almost compete with Preview Mode.
|
||
|
||
Create a secret and give it a value the same way you did for `SANITY_STUDIO_PREVIEW_SECRET` in [Step 4](#add-the-preview-secret-environment-variable). It's used to verify that webhook payloads came from Sanity infra, and set it as the value for `SANITY_REVALIDATE_SECRET`:
|
||
|
||
```bash
|
||
npx vercel env add SANITY_REVALIDATE_SECRET
|
||
```
|
||
|
||
You should see something like this in your terminal afterwards:
|
||
|
||
```bash
|
||
$ npx vercel env add SANITY_REVALIDATE_SECRET
|
||
Vercel CLI 27.3.7
|
||
? What’s the value of SANITY_REVALIDATE_SECRET? jwh3nr85ft
|
||
? Add SANITY_REVALIDATE_SECRET to which Environments (select multiple)? Production, Preview, Development
|
||
✅ Added Environment Variable SANITY_REVALIDATE_SECRET to Project cms-sanity [1s]
|
||
```
|
||
|
||
Apply the secret to production:
|
||
|
||
```bash
|
||
npx vercel --prod
|
||
```
|
||
|
||
Wormhole into the [manager](https://manage.sanity.io/) by running:
|
||
|
||
```bash
|
||
(cd studio && npx @sanity/cli hook create)
|
||
```
|
||
|
||
- **Name** it "On-demand Revalidation".
|
||
- Set the **URL** to`[your production url]/api/revalidate`, for example: `https://cms-sanity.vercel.app/api/revalidate`
|
||
- Set the **Trigger on** field to <label><input type=checkbox checked> Create</label> <label><input type=checkbox checked> Update</label> <label><input type=checkbox checked> Delete</label>
|
||
- Set the **Filter** to `_type == "post" || _type == "author"`
|
||
- Set the **Secret** to the same value you gave `SANITY_REVALIDATE_SECRET` earlier.
|
||
- Hit **Save**!
|
||
|
||
### Testing the Webhook
|
||
|
||
- Open the Deployment function log. (**Vercel Dashboard > Deployment > Functions** and filter by `api/revalidate`)
|
||
- Edit a Post in your Sanity Studio and publish.
|
||
- The log should start showing calls.
|
||
- And the published changes show up on the site after you reload.
|
||
|
||
## Next steps
|
||
|
||
- Mount your preview inside the Sanity Studio for comfortable side-by-side editing
|
||
- [Join the Sanity community](https://slack.sanity.io/)
|
||
|
||
[vercel-deploy]: https://vercel.com/new/clone?repository-url=https%3A%2F%2Fgithub.com%2Fvercel%2Fnext.js%2Ftree%2Fcanary%2Fexamples%2Fcms-sanity&repository-name=cms-sanity&project-name=cms-sanity&demo-title=Blog%20using%20Next.js%20%26%20Sanity&demo-description=On-demand%20ISR%2C%20sub-second%20as-you-type%20previews&demo-url=https%3A%2F%2Fnext-blog-sanity.vercel.app%2F&demo-image=https%3A%2F%2Fuser-images.githubusercontent.com%2F110497645%2F182727236-75c02b1b-faed-4ae2-99ce-baa089f7f363.png&integration-ids=oac_hb2LITYajhRQ0i4QznmKH7gx
|
||
[integration]: https://www.sanity.io/docs/vercel-integration
|
||
[`sanity.json`]: studio/sanity.json
|
||
[`.env.local.example`]: .env.local.example
|
||
[unsplash]: https://unsplash.com
|