* docs(examples): improve DX while copy command to create new project

* chore: apply code review

Co-authored-by: Marcos Bérgamo <Marcos.Bergamo@refinitiv.com>
Co-authored-by: JJ Kasper <jj@jjsweb.site>
114 lines
4.7 KiB
Markdown
114 lines
4.7 KiB
Markdown
# A statically generated landing page using Next.js and Plasmic
|
|
|
|
This example showcases Next.js's [Static Generation](https://nextjs.org/docs/basic-features/pages) feature using [Plasmic](https://www.plasmic.app/) as the visual page builder.
|
|
|
|
You'll get:
|
|
|
|
- Statically generated pages from your visual designs
|
|
- Development server on [preview mode](https://nextjs.org/docs/advanced-features/preview-mode) watches for changes from Plasmic Studio
|
|
|
|
## Demo
|
|
|
|
### [https://nextjs-plasmic-example.vercel.app/](https://nextjs-plasmic-example.vercel.app/)
|
|
|
|
## Deploy your own
|
|
|
|
Once you have access to the [environment variables you need](#step-3-set-up-environment-variables), deploy the example using [Vercel](https://vercel.com?utm_source=github&utm_medium=readme&utm_campaign=next-example):
|
|
|
|
[](https://vercel.com/new/clone?repository-url=https%3A%2F%2Fgithub.com%2Fvercel%2Fnext.js%2Ftree%2Fcanary%2Fexamples%2Fcms-plasmic&env=NEXT_PUBLIC_PLASMIC_PROJECT_ID,NEXT_PUBLIC_PLASMIC_PROJECT_API_TOKEN,PLASMIC_PREVIEW_SECRET&envDescription=Required%20to%20connect%20the%20app%20with%20Plasmic&envLink=https%3A%2F%2Fgithub.com%2Fvercel%2Fnext.js%2Ftree%2Fcanary%2Fexamples%2Fcms-plasmic)
|
|
|
|
## How to use
|
|
|
|
Execute [`create-next-app`](https://github.com/vercel/next.js/tree/canary/packages/create-next-app) with [npm](https://docs.npmjs.com/cli/init), [Yarn](https://yarnpkg.com/lang/en/docs/cli/create/), or [pnpm](https://pnpm.io) to bootstrap the example:
|
|
|
|
```bash
|
|
npx create-next-app --example cms-plasmic cms-plasmic-app
|
|
```
|
|
|
|
```bash
|
|
yarn create next-app --example cms-plasmic cms-plasmic-app
|
|
```
|
|
|
|
```bash
|
|
pnpm create next-app --example cms-plasmic cms-plasmic-app
|
|
```
|
|
|
|
## Configuration
|
|
|
|
### Step 1. Create an account and a project on Plasmic
|
|
|
|
First, [create an account on Plasmic](https://studio.plasmic.app/).
|
|
|
|
After creating an account, create a new project.
|
|
|
|
### Step 2. Gather your project ID and API token
|
|
|
|
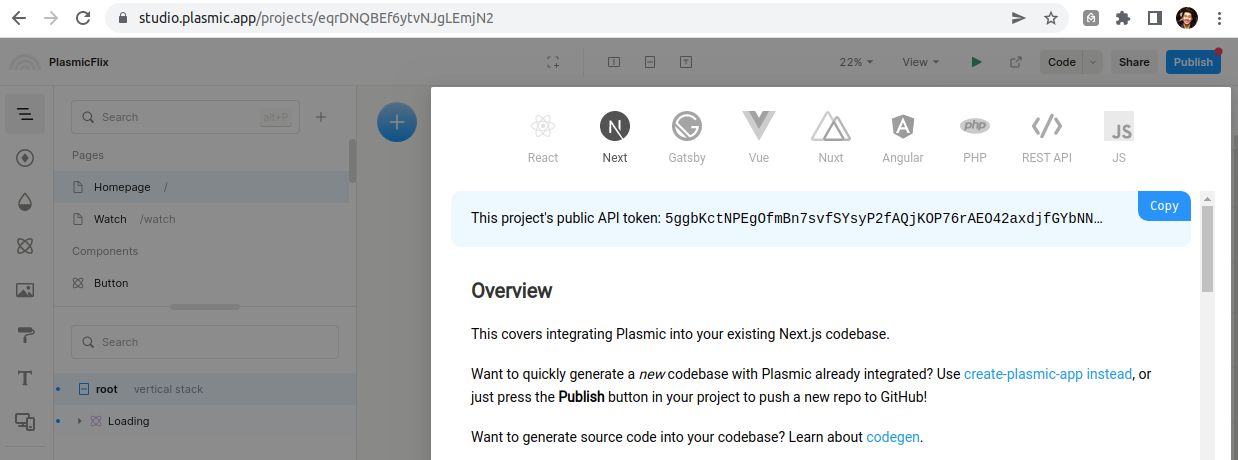
Once you've opened your Plasmic project, you can find the project ID in the URL: `https://studio.plasmic.app/projects/PROJECTID`.
|
|
|
|
The API token can be found by clicking the Code button in the top bar.
|
|
|
|
|
|
### Step 3. Set up environment variables
|
|
|
|
Copy the `.env.local.example` file in this directory to `.env.local` (which will be ignored by Git):
|
|
|
|
```bash
|
|
cp .env.local.example .env.local
|
|
```
|
|
|
|
Then set each variable on `.env.local`:
|
|
|
|
- `NEXT_PUBLIC_PLASMIC_PROJECT_ID` should be the `projectId` value in step 2.
|
|
- `NEXT_PUBLIC_PLASMIC_PROJECT_API_TOKEN` should be the API token gathered in previous step.
|
|
- `PLASMIC_PREVIEW_SECRET` can be any random string (but avoid spaces), like `MY_SECRET` - this is used for [Preview Mode](https://nextjs.org/docs/advanced-features/preview-mode).
|
|
|
|
### Step 4. Run Next.js in development mode
|
|
|
|
```bash
|
|
npm install
|
|
npm run dev
|
|
# or
|
|
yarn install
|
|
yarn dev
|
|
```
|
|
|
|
Your blog should be up and running on [http://localhost:3000](http://localhost:3000)! If it doesn't work, post on [GitHub discussions](https://github.com/vercel/next.js/discussions).
|
|
|
|
### Step 5. Try preview mode
|
|
|
|
By default, the code is set up to only build published Plasmic projects.
|
|
If you want to see changes as you make them in the Plasmic Studio, enter preview mode by opening the following URL:
|
|
|
|
```
|
|
http://localhost:3000/api/preview?secret=PLASMIC_PREVIEW_SECRET&slug=PATH
|
|
```
|
|
|
|
Be sure to replace the secret with the chosen secret in Step 3 and pick a path to preview (e.g. `http://localhost:3000/api/preview?secret=123456&slug=/`)
|
|
|
|
Now you can make edits in the Studio and see them reflected in the development server live.
|
|
|
|
You can exit preview mode at any time by going to the following URL:
|
|
|
|
```
|
|
http://localhost:3000/api/exit-preview
|
|
```
|
|
|
|
### Step 6. Deploy on Vercel
|
|
|
|
You can deploy this app to the cloud with [Vercel](https://vercel.com?utm_source=github&utm_medium=readme&utm_campaign=next-example) ([Documentation](https://nextjs.org/docs/deployment)).
|
|
|
|
To deploy your local project to Vercel, push it to GitHub/GitLab/Bitbucket and [import to Vercel](https://vercel.com/new?utm_source=github&utm_medium=readme&utm_campaign=next-example).
|
|
|
|
**Important**: When you import your project on Vercel, make sure to click on **Environment Variables** and set them to match your `.env.local` file.
|
|
|
|
## Next steps:
|
|
|
|
With Plasmic, you can enable non-developers on your team to publish pages and content into your website or app.
|
|
|
|
To learn more about Plasmic, take a look at the following resources:
|
|
|
|
- [Plasmic Website](https://www.plasmic.app/)
|
|
- [Plasmic Documentation](https://docs.plasmic.app/learn/)
|
|
- [Plasmic Slack Community](https://www.plasmic.app/slack)
|
|
|
|
You can check out [the Plasmic GitHub repository](https://github.com/plasmicapp/plasmic) - your feedback and contributions are welcome!
|